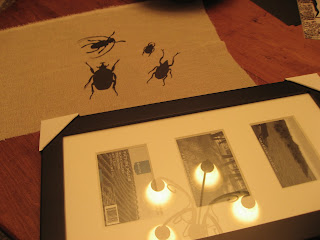
A couple of weeks ago I drove to York, PA with my Mom to go to an antique/home & garden show. While we were there I saw some beautiful framed silhouettes. One in particular caught my eye. It was a long thin frame with 4 beetle silhouettes.
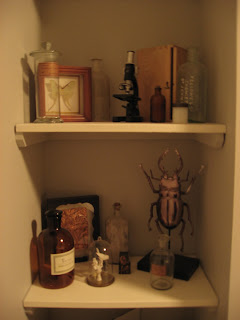
I LOVE beetles. They're one of only a few bugs that don't scare me. And design wise they have that great science-y feel I love. One of my favorite things in our house is a beetle statue. See him in the back there?
But while I loved the beetle silhouette art, it was $60 and I didn't even like the frame. It wasn't worth it for me. I would have taken pictures, but it would have been really rude in that I-am-going-to-make-this-myself-and-not-buy-yours kind of way.
So, what does a DIY savvy girl like myself do? I make my own!
First things first, make beetle silhouettes. I used the gallery at Living Jewels to pick out a few beetles that had great shapes. If you haven't gotten me a birthday present yet, this book would be a winner.
I copied and pasted about 7 beetles onto a Powerpoint slide (that way I can alter the size and fit several on one printable page) and printed them out. I did 7, intent on using only 4, figuring I would give myself some options. Then, I used rubber cement to glue that page onto a sheet of black paper. I then proceeded to cut out the beetles with an X-Acto knife. Cutting tip: go slow, and do all the little legs and antennae first, THEN cut the body.
When you're finished cutting, gently pull the printed picture and the black shape apart and rub the rubber cement off (use a pencil eraser to do the small areas).
And again, I'm a bad blogger, who didn't take pictures because I did most of the cutting during my lunch at work and couldn't really take pictures. But I think you get the idea.
I had my beetles, and on my way home from work I picked up a frame at Target for $25. I could probably have found a cheaper one elsewhere, but I wasn't in the mood to drive all over town, and I pass Target on my drive home (Note: This is trouble...I stop at Target a little TOO often). I didn't know what I was going to do for a background, but I figured I'd find something around the house.
A peek around the house showed me the giant roll of open weave fabric I've been using to make roman shades for the living room (and when I say I've been "using" it, I mean I started making them, got about 2 almost done and then got distracted by less laborious house projects). There was my background.
So I had all my materials. 4 beetles, 1 frame, 1 scrap piece of open weave fabric.
Step one:
Disassemble the frame. Toss that mat, it doesn't work for this project. Oh look, the piece of paper with pictures of scenery that comes with the frame is white on the opposite side...that will go behind my open weave fabric. Nice.
Step Two:
Glue open weave fabric to white paper that came with the frame. I suggest keeping the fabric a little to big on all sides at this point, it's easier to cut down after it's glued down than to try to get it exactly the right size from the start.
I of course don't have any appropriate glue. What do I have?
That's right, Elmer's disapearring purple school glue. But I really only need something to hold the fabric in place, so the key was to use TOO MUCH glue so that it would squish through the open weave of the fabric and hold it in place. Glue away!
Step 3:
Cut away the excess fabric. Easy peasy. Don't worry about being TOO exact, the frame will cover up any fraying edges.
Step 4:
Flip over your backing piece and place the beetles. Figure out the spacing you want before gluing. Once you know what order you want your beetles, how far apart, etc, glue them down. Again, use a little TOO much glue, glob it up...unless you have more appropriate glue. Use what you have on hand.
Step 5:
Allow everything to dry, and pop it in your frame. Then, up on the wall it goes!
Here's the thing, I've made this and I have NO IDEA where to put it. I just wanted to make it, it doesn't have a home yet. It's propped up on a chair right now. Someday I'll figure out where I want it, but for now, I'm just going to love it as is.
Remember, my inspiration piece was $60 and it was about half the size of this. My costs?
Beetle pictures: Free (thanks internet!)
Black paper: free (paper I had on hand)
Rubber Cement, Elmer's glue, X-acto knife: Free (All stuff I had around)
Open weave fabric: free (leftovers from another project)
Black frame: $25
Total cost: $25
And had I the energy to try a few other stores I am convinced I could have found a cheaper frame.


I love it Molly. I think I'll try a similar project with colored/patterned paper and butterflies! Thanks for the inspiration.
ReplyDeleteJade
www.mymessymermaid.blogspot.com