Showing posts with label office. Show all posts

Thursday, August 18, 2011

Hey, remember this?


No? How about this?


Well, now it looks like this:


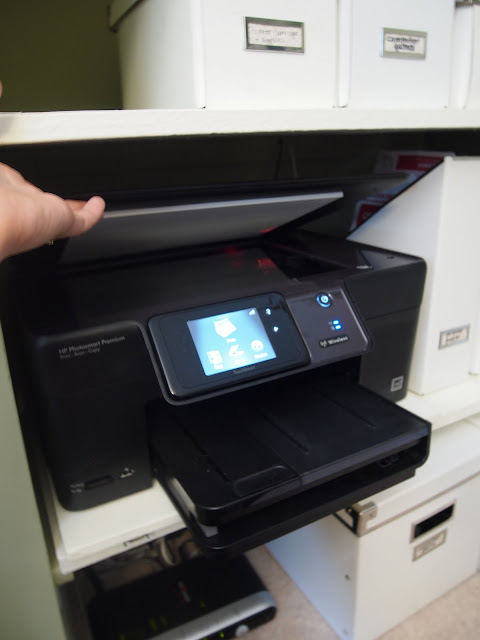
We added shelve and storage boxes to the little alcove in the office. Now it isn't just useless space anymore!

The boxes are from Ikea, their Kasset line. They're holding assorted office supplies, printer paper, computer manuals, computer/accessory cords. The printer is an HP Photosmart Premium all-in-one. I have 2 of these at work and they're great! They can print, scan and copy, they can be run wirelessly or via network cable (or both, in our case) and they're pretty slick looking. It's so nice to be able to print from my laptop downstairs rather than lugging it upstairs and hooking it up to the old printer. I believe they're about to be discontinued so you can get a good deal on them right now.

Notice, though, that the scanner lid can't open all the way because of the shelf above it. 


We needed a solution for this, since I am going to be working on a big scanning job in the near future, scanning a bunch of old family photos of Adam's family. I didn't want to be messing around with holding the scanner lid up all the time. If you look closely you can see that the printer is sitting on top of its own little shelf.


That's because we installed it on horizontal drawer runners, so that it could be pulled out and the lid would open freely. But it can still be tucked away when we're not scanning.
 
We're pretty clever if I do say so myself.
 
It actually turns out it's going to be shelf mania in the office by the time we're finished. We had planned on replacing the railing in the office with, well, another railing. But while browsing Pinterest one day (that site is Trouble with a capital T) I ran across this picture: 

Originally from Houzz.com
 
Um...yes please. Though it's much bigger than a railing, it's also a lot more functional and easier to build. It also looks very similar to our fireplace remodel, and I think it would help tie the two spaces together - you can actually see the fireplace in our living room from our office. 
 
Also, our bookshelf in the den is overflowing with books, so the added book storage will be nice and we can maybe do something else with the space in the den if we don't need the bookshelf there. We've been talking about a bar cabinet in the den for a long time, since our kitchen is small and there's no storage for liquor. All of our adult-beverage ingredients have been sitting in a cardboard box under our guest bed since we moved in. If only our guests knew they could be living it up when they slept over! 

Adam is much more on board with this idea than he ever was with the railing, so I've been prodding him to start planning construction and get moving on it. I'm crossing my fingers, but since the weather is starting to cool down here in the mid-Atlantic I have a feeling we'll be back in the yard again, tearing out old bushes and weeds. We lost steam on that project when temperatures got into the 90s and 100s.


Monday, June 27, 2011

Office Update: 4 Months Later

It's been a while since I gave you a little update on the progress in the office. And when I say a little while, I mean 4 months (sheesh!).When last we saw the office I looked like this:


Well, the honest truth is that not a whole lot has happened since then, but we have done a few new things. Here's the office today (pardon the different lighting - I'm working on using the white balance on my camera): 


Not a huge change, but a few things have gotten done.

1. New light fixture!


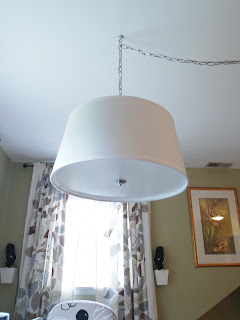
I was going to get the Eden pendant from Crate and Barrel (which has since been discontinued and replaced by the Finley) but I found this one at Tuesday Morning for $20 more. With this light I wouldn't have to wait for shipping and it had 3 bulb sockets in it, as opposed to the 1 in the Eden; meaning more light, which is important in a work area. We'll be adding a dimmer to the wall switch, though, for maximum lighting control.

So, we love the light, its much better than the old off-center flush mount fixture that was there, but there was a problem when we bought it. Can you see it?


How about a closer look?

Whoops! The cover I bought for the box in the ceiling is too small. We were not interested in cutting a new hole in the ceiling, running new electrical wiring. and patching the old one, so we swagged the chain. Home Depot and Lowe's didn't have bigger covers. What's a girl to do?

We didn't want to make the hole smaller with drywall patching, because that would require painting the patched parts. Normally not a problem, but we've yet to be able to find a white that matches the ceiling color, so anything we painted over would be the wrong white, necessitating repainting the WHOLE ceiling, which is a messy, unpleasant job in a room with a lot of weird corners, a portion over a stairwell and a hallway attached. So, what did we do? Like any normal, lazy homeowner, we cosmetically covered it up!


This little ceiling medallion cost us $25 from Architectural Depot.com and did the trick perfectly. It also added a little detail to the ceiling, which is nice. I need to buy a screw for the other of the silver cover. That's on my list of things to do today.

Next on the list of things we've done in the office:

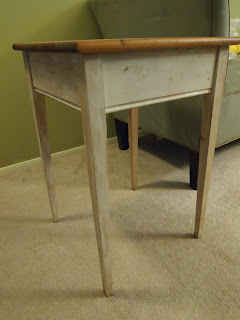
2. Refinished a little side table.

I got this baby for $4 at a yard sale:


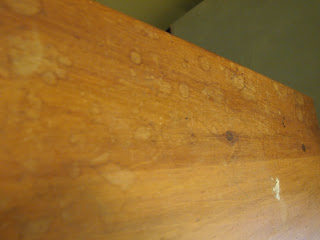
I was on board with the concept here (stained wood top, white bottom) but the actual finish was not so good.


 Distressed white-wash? Not my gig.


The top was down right beat-up. And the underside? I won't show it to you, but it was full of old spider egg-sacks (ewwwwwwww...).

So, down to the basement with it where I took it apart, cleaned of all remnants of spiders (hopefully there were no baby spiders inside...) refinished the top and repainted the bottom. All to become this:


The top is Minwax's Walnut Brown stain (I think I put on 5 coats of it, and I let them sit for 15 minutes each...I wanted it D-A-R-K) and the bottom is Sherwin Williams Roman Column (the same color as the trim in our whole house). I had the stain, the polycrylic and the paint all on hand, so this table really only cost $4 - it's holding up a $125 lamp...that evens out, right?

3. I've recovered both of our office chairs in a cool diamond print fabric:


I'd like to point out that I did not throw in a "cat lumbar pillow". That made its way onto the chair all by itself. What can I say? No matter what I'm doing- she wants to be in whatever room I'm in. She has no regard for important blog photography.

The wide shot from the start of the post is a little old, and only one chair is covered there. I did the second one a few days ago.

4. All the "stuff" that was stored in our old corner desks (remember them?) has been transplanted to Ikea Kasset boxes:


We also purchased that pretty vase (and the lamp on the little table) from some potters in Pennsylvania during a little pottery trip we took with my aunt this winter (she's our pottery guru). It's filled with sticks from Ikea and some over-sized faux pheasant feathers I found on clearance at Pottery Barn. There's going to be a couple more, but I have to transplant all of our CDs from jewel cases to paper sleeves to minimize the space they'll take up. CDs are obsolete and I don't think we even own a cd player, but we're not ready to let go of them yet. Maybe someday our kids will laugh at our ridiculous technology, just like I laugh when I find my Dad's old 8-tracks.

The boxes will be residing in some shelves we're going to build in the alcove there. We're planning the shelves this week, hoping to install them next week. Once that's done we can hook up our new printer.

5. I finally framed our diplomas! Adam graduated 5.5 years ago, I graduated 4 years ago. It's about time. Hanging them is going to require scaffolding (seriously...the wall is over the stair well) so it might be a little while before we actually get them on the wall. I tried to keep them simple, none of the fancy frames degrees are usually in. While we're both proud to have college diplomas, so we wanted to hang them up. On the other hand we don't want to boast; which is why they're in simple frames upstairs in the house, not on the 1st floor for all our guests to see.


Hanging diplomas is a hotly debated topic in the comments over on Apartment Therapy.

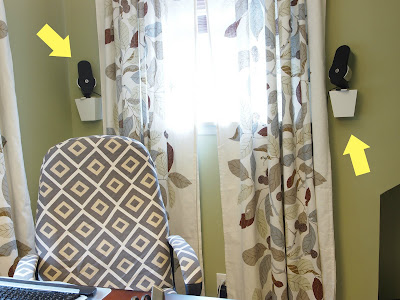
6. I put up a couple of little shelves for Adam's computer surround sound speakers on the wall behind his half of the desk.


His speakers used to always sit on his desk, so he didn't actually have surround sound, he had "front and sides" sound. This looks better, too. It was like he had a little wall of speakers around him before.

There's still a lot to do in the office, and it's slow going, but we'll get there. It certainly looks a heck of a lot better than it did!

Thursday, January 27, 2011

Many unrelated things

This is a post about lots of things, mostly unrelated to each other.

1. Adam got a new job...or he's transitioning to one. He's staying at the same company but changing positions, so he'll be training his replacement as well as training for his new job at the same time. He'll be traveling a LOT less when he's doing the new job full time. Probably on the road only a few times a year, rather than 2 weeks every month. I'll be glad to have him home, but it will be change on the homefront, too. Our entire relationship we've either lived far enough apart that we only saw each other on weekends, or he's had this job where he's gone most of the week and home weekends. We may have to set some groundrules regarding sharing the TV...

2. On a less "big life step" note, we picked a color for the office upstairs. It was between 3 Valspar colors - Fishnet, Shade Green and Marine Reef (in order, left to right)


We're going with Shade Green, in the middle. 


I've bought the paint, I just haven't started painting yet. It'll happen when it happens. It's a big job because Adam uses his desktop computer on a daily basis and I need access to my printer for Etsy purposes, so it's a bit of a pain to disassemble the room.

3. We bought this little lady to be our "comfy reading chair" in the office. Okay...so it's not a chair. It's a chaise (which is only 2 letters off "chair"). She is small, as chaises go. With my bum in corner, my heels are at the edge on the right side. It's like a love-seat sized chaise. The cats LOVE it, and we find them on it constantly. I found her at Marshall's, marked $300, down from $550 in regular stores.


But I got her for only $200. Why? This is why:


A little hole, about the size of a nickle on the side of the arm. For $100 off I can find some matching thread and sew this bad boy up so it doesn't get any bigger and make it less visible then cover it with a throw blanket. We probably would have put a throw on it anyway, for cuddle up with a good book purposes. Two birds, one stone.

Now we just have to hope it fits when the table comes. We'll make it work, Tim Gunn Style.

4. Speaking of the table (the Mission Dining Table from World Market that we'll be using for a desk) the freight company tracking website says it's not longer in California, and was loaded on a truck in Indiana yesterday. It should be here sometime in the next 7 days.

5. I am counting down the days until I can pre-order an iPhone with Verizon. No, it's not house related...but I don't care. I really want that phone.

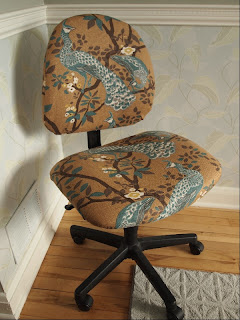
6. I had a snow day yesterday, so I recovered this office chair with some lovely fabric by Dwell Studios for Robert Allen Home. It's going to my office at school.


One chair down, 3 to go. 
I got these for free from my Mom's office. I'm not sure why they were getting rid of them, there's nothing wrong with them, except maybe the fabric is worn out, but who cares because I'm recovering them. The big one on the left is going in our office at home with a diamond print fabric I'll reveal later. The medium one on the right is going to my classroom at work so I can have a cushioned seat as opposed to the hard plastic one I have now, I'm deciding among several fabrics for that one. The little one...doesn't have a specific home yet. I might just put it in the basement until the need arises for it. Or Freecycle it. Or recover it and sell it on Craigslist.

And actually, it's 4 to go, because I'm recovering this chair, too. So that both our office chairs will be in the same fabric. (This photo is from the apartment we lived in 1.5 years ago...ugh, so cluttered.)

UPDATE: I started painting upstairs today, it being my second snow day in a row. While the office itself is going to require some semi-serious thought when it comes to coordinating painting the room and continuing to USE the room, the hallway was a breeze. Got the trim painted, 1 side of 1 door painted and 1 coat of wall color on. Touch-ups tomorrow and continued door painting through the weekend. Pictures at some point, when the doors are done and I've peeled all the tape off.

Tuesday, January 11, 2011

Making it Office-al

New Year, New Room. I am unable to not have a project, it seems.

On Friday night Adam and I drove to West Virginia, and it was not a fun drive. It should have taken 5 hours. According to our GPS we were making good time in the beginning, and we shaved nearly 30 minutes off our arrival time. Have I ever mentioned that my husband has a lead foot? Ultimately however, we were on the road for 6 hours (and if you count the 30 minutes we WOULD have saved, we ended up adding 1.5 hours to our trip). Why? Snow...and mountains. Now, don't get me wrong. I LOVE snow. I'm a teacher for heavens sake, snow is the greatest thing ever. And mountains are okay, they make for nice views. But snow + mountains + dark + West Virginia State Highway Adminstration deciding it wasn't worth plowing or salting once the sun went down = not driving more than 40 mph for the last hour of the drive. We got in at 1:30 am went to bed, got up the next morning, stayed in Wheeling, WV for 5 hours (we were there for a funeral and there's not much else to do there), and it was time to head home again. Luckily the drive home was much easier, all the roads were dry and the sun was out, so we made it home in 5 hours (not counting the hour we took to eat at The Black Hog in Frederick, MD...delicious).

So, even after this exhausting trip. And even though we were excessively happy to be home and should have just wanted to relax, there was no stopping me, it was time to work on a plan for the office/hallway/stairs.So, that's precisely what I did.

The blog keeps me accountable. I get things done when you all know about it, because I think you're thirsting for more updates. (are you?) Let's see what's what then.

First off, I'll show you what we're working with. Starting with the stairs, since they're the entrance to the room. People often walk into our house and ask, "Wait...how do you get upstairs?" Our stairs are tucked away behind the living room and people often don't even notice they're there. Look at this old picture from a few days after we moved in.


You see, our house was built in 1947, and back then it was a single story, 2 bedroom, 1 bathroom home. Sometime in the 80s or 90s the owner blew off the roof and added a whole 2nd story, and it became a 5 bedroom 2 bathroom. That why the stairs are in a strange place, the home was never intended to HAVE another set of stairs. 
What that means for you, dear readers, is that the stairs are all but impossible to photograph. I laid on the floor and took a BUNCH of photos, and these are the best I could get from the 1st floor. 


But it makes a little more sense when you're on the 2nd floor looking down the stairs.


Now, lets give the space some context. 


Notice the paint chips on the wall...color choosing has begun, and you're getting a little preview here. 

There in the bottom right corner is the stairwell and the railing keeping you from falling into the stairwell (sort of...we'll get to that in a moment). The rest of the room, you can see, is open. The office is kind of a sitting area at the top of the steps. It doesn't have a door or anything, We're using it as an "office" for our computers and want to keep using it for that. I feel weird calling it an office, it's not like we do business there. Adam plays games, I blog, do creative paper crafting stuff and maintain my Etsy site. It's more of a computer room, not an office. But we're both working on corner desks from back in our not-living-together days, when we were fine facing a corner, because we were probably talking each other on the computer (remember, Adam and I met online). Now, however, It's weird to be in the room with our backs to each other, and also it's time to move on from our tubular steel and particle board desks. We're not in college anymore. We can do better. 

Also attached to this room, across from the stairwell, is the hallway off of which the 3 bedrooms and 1 bathroom upstairs branch off from. 


The smallest bedroom is on the left, with the door cracked (I use that as a closet/dressing room) the door on the right is the master bedroom, and the door at the back is the bathroom. The medium sized bedroom is behind and to the left in these photos. 

As you may have gathered, we'll have the stairs, office and hallway to deal with at once on this decorating project. It's a difficult space because it's 3 different sections that are all connected. And then, there's this. 


Yes, this space above/behind our stairwell TOTALLY looks like a crows nest on a ship. 


My father literally wiggled his way back there when we were considering buying this house and shouted "Ahoy There!"  We know, it's weird (both my Dad and the space). And from what we can figure out, there's not much we can do to eliminate it. And it's going to be horrible to get back there and paint that space (we're still trying to figure out how to even do it).

Did you also notice the railing around the stairs, and the width of the gaps between the spindles? Whenever we walk someone through the house who has small children, they get to this room and get very paranoid that their child is going to fall through the railing. We can't blame them, it could happen. This railing is actually really unsafe for anyone under the age of 12. We're going to be replacing it in this makeover. 

With all that said, what's the plan, Stan? Let's go to the Mood Board!


1. Curtains. We already own these Ikea Stockholm Blad Curtains. We hung them in our den in our apartment and I love them. I'm excited to get them hung up again (also, they were not cheap as Ikea curtains go, so I'm not ready to give them up)

2. Color Scheme. You know me, I might end up changing this. But for the most part I'm pulling colors from the koi fish batik art (more on that in item 4) I'm trying to connect this space to the master bedroom next door by using the yellow.

3. This is the Eden Pendant Lamp from CB2. I'm still working on convincing Adam that it would be great to hang a pendant lamp over the desk. I'm usually pretty good at convincing him of things, though.

4. This is a batik print of koi fish we purchased at a craft fair quite a while back. It's by Janice Cline and we've been trying to find a place to hang it since we moved here (and struggled to find a place for it back when we were in our apartment). I'm pulling a lot of our colors from this print.

5. A new printer. This is a big requirement for the new room. We want a good quality, wireless/networkable all-in-one printer (printer, scanner, copier). We have 5 computers, right now and it's a huge pain to hook up 3 of those 5 to our printer via USB cable. We want to be able to print wirelessly or via network connection.

6. A external hard drive, again, networkable. With 5 computers, my photo taking habit for the blog, and Adam's habit of downloading huge quantities of music, we need more computer memory storage. And we want to be able to save to it without having to physically hook up to the hard drive. This a 2 Terabyte 
(thats right, terabyte) Western Digital hard drive.

7. The desk. Were going to rearrange and use the Mission Extension Dining Table from World Market as our desk. We'll be sharing it, and facing each other, a la this layout from Made By Girl

We will be placing our desk/table (deskable? tabesk?) under the large double-wide window with our chairs facing each other. Can't you just see it with the curtains behind it, some new mini-blinds (yes, there WILL be new blinds - I'm so SICK of those copper ones) and that pendant light hanging above? I can see it.

8. Wall color. The final wall color is still TBD, but we're choosing among versions of this muted sage color.

9. I'm loving this zig zag fabric and I want to use it to recover the leafy office chair and a second similar chair. I can frequently get these office chairs for free from my Mom's work. Usually all that's wrong with them is that the upholstery is beat up, but I recover them anyway, so it doesn't matter. You can see how I recover these chairs here.

10. A comfy chair for book reading and laptop work. This room gets fantastic light, and the 2nd floor of the house is usually pretty quiet. It's prime book-reading space. I'm loving this chair, but no promises. We spent big bucks on the table (we had to have it shipped to use so tack on beau coup dinero in freight charges) so we'll have to play some limbo and see how low-can-we-go with the chair. I'm thinking I'm going to find an inexpensive used chair and recover it.

11. Same for the ottoman, small, cheap, recover in something fun! I'm also on the lookout for an inexpensive pouf...because I want a pouf like nobody's business.

12. We already own this filing cabinet. You can see it under the windows in the picture above. But, it's "putty" colored (that's actually the name of the color when you shop in Office Depot). Putty reminds me of The Putties from Mighty Morphin Power Rangers.

Yes, I just busted out a Power Rangers reference. It was bound to happen. I'm surprised it took me THIS long into running a blog to mention them. Anyway, back to the filing cabinet, I'm working on finding out a way to paint it (spray paint? getting it professionally powder coated?) I think this will end up being the thing that fills in any "this room needs a little flair" gaps. 

13. The railing. This will be the absolute biggest job of the office, because we'll be building this mission/arts and crafts style railing ourselves. We want the standoff handrail to be stained wood (close to the color of the table) and the rest to be white, like the rest of the trim in our house.
Other goals? We're going to finally hang up our college diplomas (um, how long has it been since we graduated? 6 years for Adam, 3.5 years for me...it's about time). I want desk space to work with a Wacom Tablet. Whatever happens as far as color goes in the office will extend into the hallway. Also, all the doors up there need a coat of paint. The old owner slapped on 1 thin coat just to make the doors look good for showings, but when you really look at it, it's not a good situation. Plus, our trim is slightly off white, not pure white.

The little alcove under the small window will become shelves, and that's where the printer and hard drive will go. I'm thinking I might paint the back wall with a pop of color. I'm also looking for a small storage cabinet for assorted office-y things (paper, envelopes, etc). 

The hunt for desk accessories will be an extensive one.

Wish us luck! I'm already starting to do some painting this week!

Wednesday, January 13, 2010

Free Chair to Fab Chair

Ahhh, exam week. It's a good week to be an art teacher. Since I don't give midterms, I don't have to grade midterms. So this week I've only had to work 2 days and even then it was only proctoring tests and I was done around 11 am both days. I am off work for the rest of the week! I have a little bit of grading to do, but I brought it home with me.

So, this week I'm working on some little sewing projects that I've been putting off. I'm not going to call myself much of a seamstress, I mostly make things up on the fly but somehow they usually work out...or they're a huge failure. Today, Mom's office chair. Fabulous or flop?

Every once in a while my Mom's work gives away old office chairs that have seen better days. I got one one last summer and my Mom got one a few weeks later. I recovered mine some time ago but didn't take step-by-step photos, but this time, I knew better!

What you need:
One old junky looking office chair
2 yards upholstery fabric of your choice
coordinating thread
strong string or ribbon (thin, 1/4 inch or smaller)
pins
scissors
measuring tape
sewing machine (nothing fancy, mine is a little $129 dealy)

Here's the chair at first:


Now, when beginning a makeover it's very important that America's Next Top Model be on the TV, otherwise you're asking for trouble.

Okay...kidding.

Anyway, that chair is not looking good, is it now? I mean, it was pretty blah to begin with, and then add in a bunch of stains and it's just a sad sad little thing.

1. First things first, disassemble the chair. This is where keeping all those allen wrenches from all your Ikea furniture comes in handy.


2. Lay out your fabric of choice, good side down. Lay the seat cushion of the chair face down on the fabric and cut out a piece of the fabric roughly the shape of your seat but bigger. Probably about 6 inches bigger. I am not big on measuring, just guestimate. Cut it smaller if your seat cushion is thinner.


3. Do the same with the back of the chair, but this time you only want about 4 extra inches around the shape, and you need to cut out one with the front of the back facing down and one with the back of the back facing down.


4. This is the only measuring I did. Measure how thick the side of your chair back is. Mine was 3.25", roughly (are you seeing a pattern here? everything is very "uhhh, yeah, that looks fine" with me)


5. Cut 2 strips of fabric that are 1.5 to 2 inches wider than the measurement you just took of your chair's back and half the length of the perimeter of your chair back.


6. Now, let's assemble the cover for the back. You just need to lay the pieces, right side down, on the back of the chair and then pin along where the seams will be. Your two long strips should meet at the top in the middle so there will be a seam there.


7. You don't want to enclose the bottom of this portion. You want to be able to slip the cover off the chair with the pins and slip it back on after you've sewn. You should leave flaps at the bottom. So, about 3 inches or so from the bottom of the back stop sewing the seams together and leave flaps of fabric on all 4 pieces. Fold the edges of the flaps over and sew them down so they look finshed. (This photo was taken AFTER sewing because it was REALLY hard to show with all the pins)


8. Now, carefully slide the pinned fabric off the back cushion and sew. I didn't take any photos of sewing because there's not much to see. You just want to sew along your pin lines, keeping the fabric inside out and removing the pins as you go. 

9. Returning to your seat cushion, take the shape you cut out and fold over and pin 1 inch all the way around the edge. Now, sew this fold down, leaving 1/2" between the fold and the stitch. YOU MUST LEAVE ABOUT 1.5" BETWEEN THE START OF YOUR STITCH AND THE END OF YOUR STITCH. This is where you will thread the drawstring (think of the drawstring on sweatpants, there's a gap between the two holes where the strings come out).

10. Tie a string or ribbon (ribbon was the strongest thing I had on hand, you want something that won't break with tension) to a safety pin and thread the pin and ribbon around your seat cushion cover.


11. Great, now you can put covers on! For the seat, place the cushion in the middle of your sewn/threaded fabric and pull your drawstring until the fabric closes up and is pretty tight.
 

12. Now you can slide your back cushion cover on and if you need to cut small holes in your fabric to get any screws through. Finally, reassemble the chair, and you're done!


Much better, right? Like I said, this one is for my Mom. Mine is a little more modern looking, with fabric from Ikea, but was made in the exact same way except that it had fabric on the arms that needed to be replaced.


Possibly most importantly, cost. It depends on the fabric you buy, but the total cost of this little project was a whopping $10 ($5/yard for 2 yards of fabric). Everything else I had on hand. You might need to spend an extra buck on the ribbon. And remember, the chair was free!

Enjoy it Mom!
(Actually, Mom uses a laptop on the couch...Dad will get the bulk of the benefit from the chair)